
How to Install Solar Panels and Inverter by Yourself A Complete DIY Guide step by step
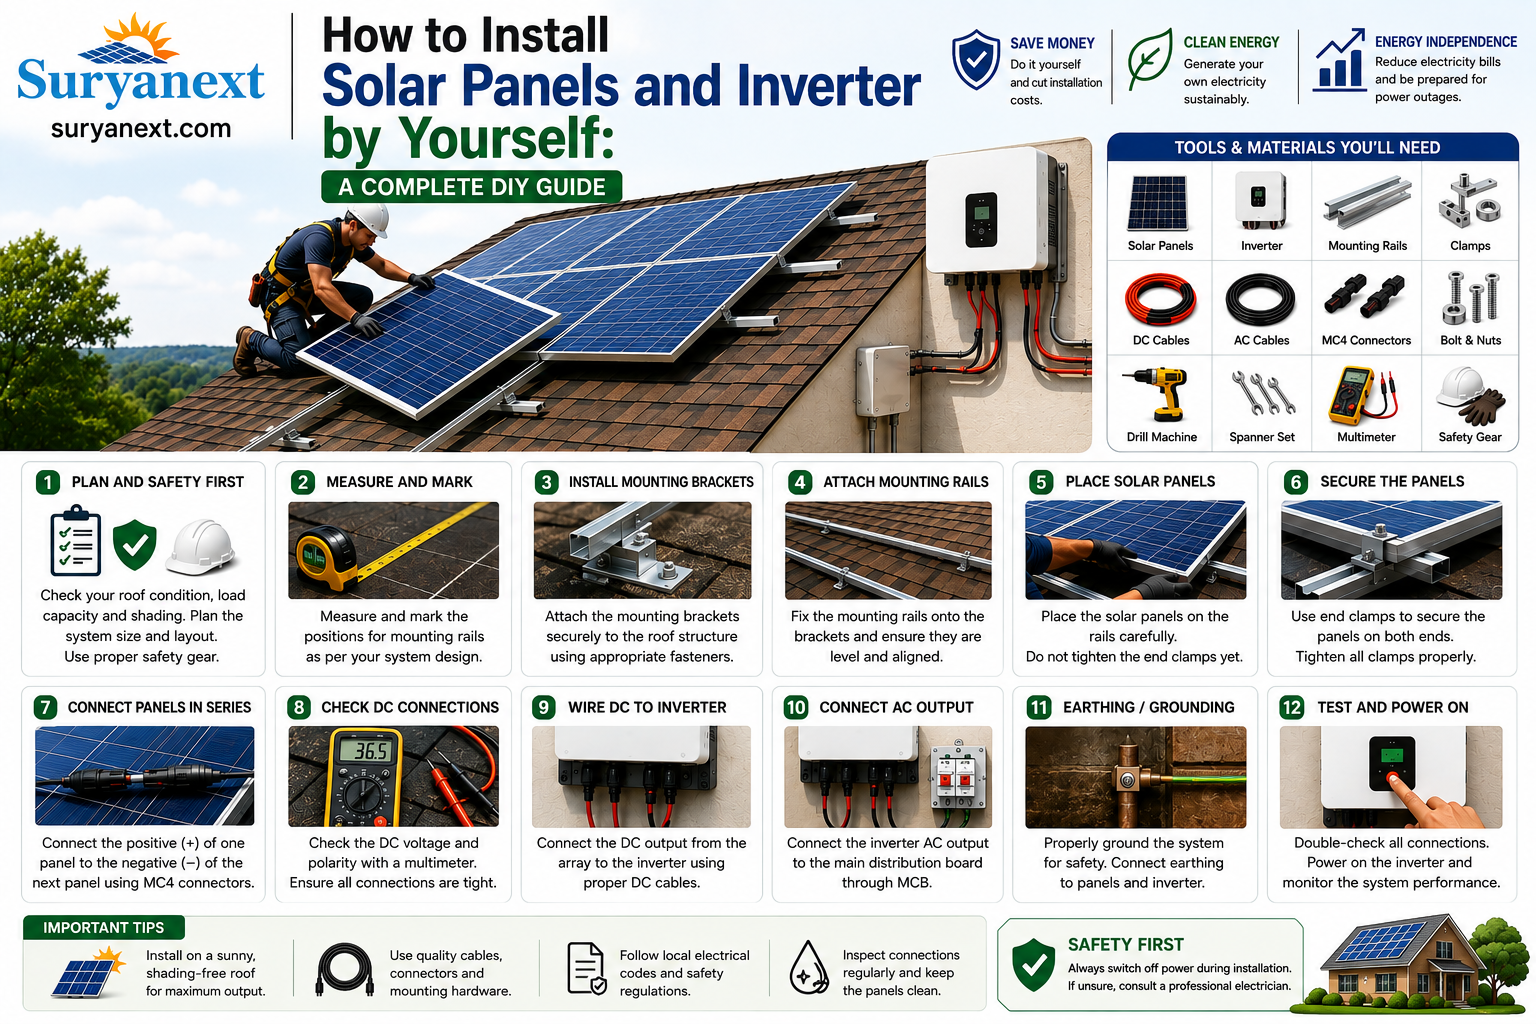
How to Install Solar Panels and Inverter by Yourself A Complete DIY Guide step by step
Installing solar panels at home can help reduce electricity bills and make your home more energy independent. With the growing interest in renewable energy in India, many homeowners are searching for ways to install a solar panel system themselves.
But can you really install solar panels and an inverter by yourself?
Yes, some parts of a solar installation can be handled as a DIY project, but electrical connections, rooftop work, earthing, protection devices, and grid-connected systems should be inspected or completed by a qualified solar/electrical professional. Incorrect wiring can cause electric shock, fire, equipment damage, or other serious hazards.
This guide explains how a typical residential solar panel and inverter system is installed, what equipment you need, and which steps require professional assistance.
What You Need to Install a Solar Power System
Before starting the installation, prepare all the required components.
A typical rooftop solar system may include:
1 Solar panels
2 Solar inverter
3 Mounting structure
4 DC cables and connectors
5 AC cables
6 DCDB
7 ACDB
8 DC surge protection device (SPD)
9 AC surge protection device
10 Earthing system & LA
11 Solar panel junction/combiner box
12 MC4 - connectors
13 WIFI
14 Mounting hardware
15 Cable clips and cable management accessories
16 Bi-directional/net meter for eligible grid-connected systems
The exact components depend on whether you are installing an on-grid, off-grid, or hybrid solar system.
Step 1: Decide Your Solar System Size
The first step is to determine how much solar power your home needs.
Check your previous electricity bills and calculate your average monthly electricity consumption.
For example, if your household uses approximately 300–400 units of electricity per month, a properly designed rooftop solar system may significantly reduce your electricity consumption from the grid.
However, system size should not be selected only from monthly units. Roof space, sunlight availability, inverter specifications, panel orientation, local regulations, and your electricity connection also need to be considered.
A professional solar installer can help determine the appropriate system size for your home.
Step 2: Choose the Right Location for Solar Panels
Solar panels need maximum exposure to sunlight.
Before installing the mounting structure, inspect the roof for
1 Shading from trees
2 Nearby buildings
3 Water tanks
4 Chimneys
5 Antennas
6 Roof structures
7 Potential areas of water accumulation
Even partial shading can reduce the output of a solar array.
For homes in India, the ideal panel orientation and tilt depend on the location. A solar professional can calculate the best orientation and tilt angle for your specific roof.
Step 3: Check the Roof Before Installation
Never start installation without checking whether the roof can safely support the mounting structure and panels.
Inspect:
1 Roof condition
2 Structural strength
3 Waterproofing
4 Available installation area
5 Access for maintenance
6 Drainage paths
7 Safe working areas
If the roof is damaged or structurally questionable, consult a qualified professional before installing anything.
Step 4: Install the Solar Mounting Structure
The mounting structure supports the solar panels and keeps them securely positioned.
Generally, the installation involves:
1 Measuring and marking the panel layout.
2 Positioning the mounting rails or support structure.
3 Fixing the structure using appropriate hardware.
4 Maintaining the recommended spacing between panels.
5 Checking that the structure is level and properly aligned.
6 Ensuring that waterproofing is maintained wherever the roof is penetrated.
Do not drill into the roof without understanding the roof construction and waterproofing requirements.
A poorly installed structure can become dangerous during strong winds and may cause roof leakage.
Step 5: Mount the Solar Panels
Once the structure has been securely installed, the solar panels can be placed on the mounting rails.
Handle solar modules carefully because their glass surfaces can be damaged by impact or incorrect handling.
Secure each panel using the manufacturer's recommended clamps and hardware.
Make sure:
1 Panels are properly supported.
2 Clamps are installed in the manufacturer's specified locations.
3 Panels do not touch each other.
4 Cables are secured away from sharp edges.
5 Connectors are protected from standing water.
6 The installation does not create a trip hazard.
Do not walk or place heavy objects on solar panels.
Step 6: Connect the Solar Panels
Solar panels generate DC electricity when exposed to sunlight.
Depending on the system design, panels can be connected in series, parallel, or a combination of both.
The correct configuration depends on:
1 Panel voltage
2 Panel current
3 Number of panels
4Inverter MPPT voltage range
5 Maximum inverter input voltage
6 Maximum input current
7 Temperature conditions
This is one of the most important parts of the installation.
Never connect panels simply based on how many panels you have. The string voltage and current must remain within the inverter manufacturer's specified limits.
Incorrect DC wiring can damage the inverter or create a serious electrical hazard.
Step 7: Install the Solar Inverter
The inverter converts the DC electricity generated by solar panels into usable AC electricity for your home.
Choose a suitable location that is:
1 Dry
2 Well ventilated
3 Protected from direct rain
4 Easily accessible
5 Away from excessive heat
6 Suitable according to the inverter manufacturer's installation instructions
The inverter should not be installed in a location where it can be exposed to flooding or excessive moisture.
Maintain the clearance recommended by the manufacturer around the inverter.
Step 8: Connect the DC Side to the Inverter
The solar panel strings are connected to the inverter's DC input.
Before making any electrical connection, the system must be isolated and verified as safe.
The DC side may include:
Solar panels → DC protection/isolator → Inverter
The exact arrangement depends on the inverter and system design.
Use correctly rated cables, connectors, isolators, and protection devices.
Never assume that a cable or connector is suitable simply because it physically fits.
Step 9: Connect the AC Side
The inverter's AC output connects to the home's electrical distribution system through appropriately rated protection equipment.
A typical arrangement may include:
Inverter → AC protection/isolator → Distribution board → Home loads
The cable size, breaker rating, isolator, and protection equipment must be selected according to the inverter output and applicable electrical requirements.
Because this connection involves your home's electrical supply, it should be completed and tested by a qualified electrician.
Step 10: Install Earthing and Protection
Proper earthing and electrical protection are essential parts of a solar installation.
Depending on the system, earthing may be required for:
1 Solar mounting structure
2 Equipment
3 Inverter
4 Other exposed conductive parts
Surge protection devices may also be required to protect the system from electrical surges.
The correct earthing arrangement and protection requirements depend on the equipment, installation type, local electrical rules, and site conditions.
Do not treat earthing as an optional feature.
Step 11: Turn On the Solar System
Once installation and testing are complete, the inverter can be started according to the manufacturer's instructions.
The inverter may perform automatic checks before beginning operation.
After startup, check the inverter display or monitoring application for:
1 Solar generation
2 DC voltage
3 AC voltage
4 System status
5 Fault messages
6 Daily energy production
If the inverter displays a fault, do not repeatedly restart it without identifying the cause.
Can You Install an On-Grid Solar System Yourself?
An on-grid solar system is connected to the utility electricity network.
Because it interacts with the electrical grid, additional requirements may apply, including:
1 Utility approval
2 Approved equipment
3 Electrical inspection
4 Net-metering or applicable metering procedures
5 Required documentation
6 Compliance with local regulations
Therefore, a completely DIY grid-connected solar installation is generally not recommended.
You can learn about the system, select equipment, prepare the roof, and perform some non-electrical work, but grid connection should be handled through the appropriate qualified professionals and utility process.
How Much Does DIY Solar Installation Cost?
The total cost depends on the system capacity, solar panels, inverter, mounting structure, wiring, protection equipment, installation location, and local labor costs.
A DIY approach may reduce some labor expenses, but saving money should never come at the expense of electrical safety.
The most important cost factors include:
1 Solar panel price
2 Inverter price
3 Mounting structure
4 DC and AC cables
5 Protection devices
6 Earthing
7 Installation labor
8 Transportation
9 Government/utility-related requirements
For grid-connected residential systems, installation through an approved or qualified installer may also be necessary for certain subsidy or utility processes.
How to Maintain Your Solar Panels
After installation, regular maintenance helps keep the system operating efficiently.
Clean the panels when necessary, especially when dust and dirt accumulate.
Also check periodically for:
1 Visible panel damage
2 Loose cables
3 Corrosion
4 Water leakage
5 Inverter warning messages
6 Mounting issues
7 Unusual changes in electricity production
Do not climb onto the roof if safe access is not available.
Frequently Asked Questions
You can perform some non-electrical installation tasks yourself, but electrical wiring, earthing, testing, rooftop safety, and grid connections should be handled by appropriately qualified professionals.
Can I install a solar inverter myself?
Can I install solar panels without an electrician?
For certain small off-grid systems, technically knowledgeable users may perform some work. For residential systems connected to the electrical grid, professional electrical work and compliance with local requirements are important.
How many solar panels do I need for my home?
Is DIY solar cheaper?
DIY work can reduce some installation labor costs, but equipment, protection, wiring, mounting, testing, and compliance costs still need to be considered. Safety should always be the priority.
Is solar panel installation safe?
Solar installation can be safe when properly designed and installed. However, solar panels can produce DC electricity whenever exposed to light, and rooftop work also creates fall hazards. Appropriate electrical and fall-protection procedures are essential.